Changing your domain name is one of the scariest SEO decisions a WordPress site owner can make. Done right, your search rankings survive the move mostly intact. Done wrong, you can lose months of work overnight.
I’ve audited post-migration sites where everything looked fine on the surface, only for missing redirects, stale canonical tags, or a sitemap still pointing to the old domain to kill rankings for weeks. I’m here to make sure that doesn’t happen to you.
In this guide, I’ll walk you through the full verification process: capturing your SEO baseline before the move, confirming your redirects work, checking the canonical URLs and database links that trip most sites up, and tracking your recovery.
TL;DR: Use
Duplicator
to migrate and back up your site,
All in One SEO
to verify and update your canonical URLs and redirects, and
MonsterInsights
to track your ranking recovery. Most sites recover 80–100% of rankings within 4–8 weeks when all 301 redirects are in place.
You can use the quick links below to navigate through the article:
- Why Domain Migrations Put Your SEO at Risk
- Step 1: Build Your Pre-Migration SEO Baseline
- Step 2: Migrate Your Site With Duplicator
- Step 3: Set Up 301 Redirects From Your Old Domain
- Step 4: Register Your New Domain in Google Search Console
- Step 5: Verify Canonical URLs Are Correct
- Step 6: Fix Database URLs, Mixed Content, and Broken Links
- Step 7: Monitor Ranking Recovery With AIOSEO and MonsterInsights
- Your Week-by-Week Recovery Timeline
- Frequently Asked Questions About Domain Migrations & SEO
- Additional Resources for Domain Migration SEO
Why Domain Migrations Put Your SEO at Risk
When you change domains, Google has to discover your new URLs, process your
301 redirects, and re-evaluate your content before it transfers your
existing ranking authority. That process takes time, and errors at any stage
can delay or permanently reduce your SEO recovery.
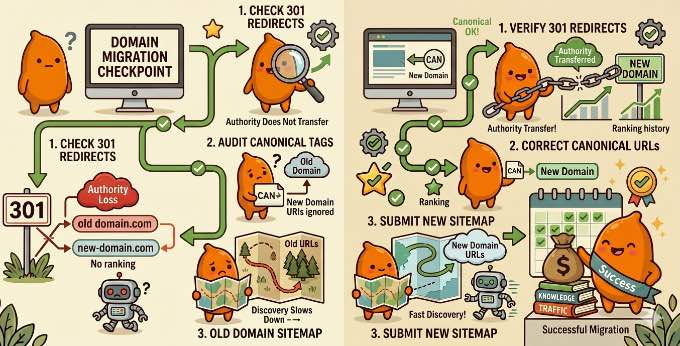
Most ranking losses after domain migrations come from three specific failure points:
- Broken or missing 301 redirects: Without a 301, Google treats your new domain as a brand-new site with no ranking signals. Your old domain’s authority does not transfer.
- Stale canonical URLs: A canonical URL tells search engines which version of a page is the “official” one to rank. If your new-domain pages still have canonical tags pointing to the old domain, Google will try to rank the old URL instead of the new one.
- A sitemap referencing the old domain: Google uses your sitemap to discover and crawl pages. A sitemap pointing to old URLs slows down the discovery of your new domain’s content.
All three are fixable. The steps below walk you through checking each one in
the right order, starting before you migrate.
Note: I built this guide to run before and through your migration, so Step 1 captures a pre-migration baseline first. If you’ve already moved your site, then skip that baseline and start your checks at Step 2.
Step 1: Build Your Pre-Migration SEO Baseline
Before you migrate your site, you should capture a snapshot of your current SEO performance.
Without a baseline, you have no way to tell whether your rankings are recovering normally after the move or whether specific pages are silently losing ground.
Export Your Keyword Rankings
Your keyword baseline is the ‘before photo’ you’ll compare against at weeks
1, 2, and 4 after migration. You’ll want to export your current keyword
positions, clicks, and impressions before touching anything on your site.
You can do this for free directly from Google Search Console, or from within
WordPress if you have All in One SEO’s Elite plan.
To export from
Google Search Console, select your site property and click ‘Search Results’ under ‘Performance’
in the left sidebar. Set your date range to the last 3 months, then click
‘Export’ at the top right and choose ‘Download CSV’.
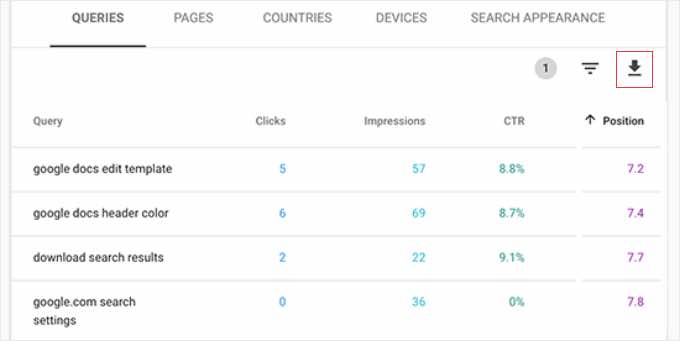
Before clicking export, make sure to sort your data by ‘Impressions’ or ‘Clicks’ (highest to lowest). This ensures your top 1,000 keywords are your most valuable ones.
Then save the exported file in a dedicated migration folder on your computer. This CSV contains the four columns you’ll need for your baseline: query (keyword), clicks, impressions, and average position.
Note: Google Search Console will export up to your top 1,000 keywords, which is plenty for tracking your core SEO baseline.
If you have All in One SEO’s Elite plan, then you can pull the same data without leaving WordPress.
Simply go to AIOSEO » Search Statistics, where your keyword
positions, clicks, and impressions are already pulled in from Google Search
Console. For more details, see our guide on
how to see search analytics in WordPress.
Click the ‘Export’ button to download a CSV of your current keyword
positions. Save this alongside your Google Search Console export in the same
migration folder.
Whichever method you use, make a note of your top 20 keywords and their
current average positions before closing the tab. Also take a screenshot of
the overview for a quick visual reference during the stressful
post-migration period.
Make sure to keep both the CSV and the screenshot in your migration folder. You’ll open them again at weeks 1, 2, and 4 post-migration to measure recovery progress.
Crawl and Document Your Current URLs
A complete list of every page on your site is your roadmap for setting up redirects later. If a page is missing from that list, it won’t get a redirect when you move. And once its old address stops working, the search ranking that page built up is gone for good.
You can use Screaming Frog SEO Spider (free for up to 500 URLs, with unlimited crawling available on their paid plan) to crawl your current site.
Simply enter your domain in the search bar at the top and click ‘Start’. Screaming Frog will then crawl every URL it can discover on your site.
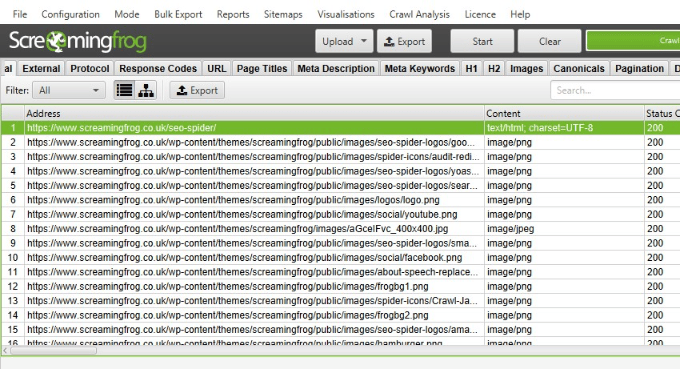
Once the crawl is complete, you’ll need to go to File » Export in Screaming Frog and save the full URL list as a CSV. To get a clean list of just your images, click the ‘Images’ tab in Screaming Frog before hitting export.
Tip: If you run a photography or recipe blog, make sure to crawl your image assets too, so you don’t lose that valuable image SEO.
Store this file in your migration folder alongside the keyword export.
While reviewing the crawl results, you will want to look for any URLs that already return a 301 or 302 status. These existing redirects need careful handling during migration to avoid creating redirect chains.
Also, record your homepage canonical URL.
Right-click your homepage, select ‘View Page Source’, and press Ctrl+F (Cmd+F on Mac) to search for <link rel="canonical".

Step 2: Migrate Your Site With Duplicator
The method you use to migrate your site is actually your first major SEO decision.
For the transfer itself, I strongly recommend using Duplicator because of how safely it handles your database during the move.
Haven’t migrated yet? Please pause here and follow our complete guide on
how to move WordPress to a new domain without losing SEO. Once your transfer is finished, come right back here to run through the verification steps below.
When you run the Duplicator installer on your new domain, it automatically
updates every URL stored in your WordPress database to reflect the new
domain. This includes automatically fixing your internal links and image paths.
This automatic URL replacement is what prevents the stale canonical and
mixed-content problems covered later in this guide. Tools that skip this
step leave old-domain URLs scattered throughout your database, which you
then have to find and fix manually.
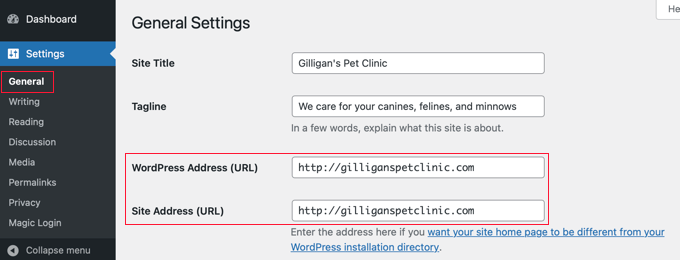
Once your migration is complete, confirm it worked cleanly by going to Settings » General in your new WordPress dashboard. Both the ‘WordPress Address’ and ‘Site Address’ fields should show your new domain URL. If they do, then you are ready to move on to the next step.
Important: While you’re in your new WordPress dashboard, go to Settings » Reading and confirm the ‘Discourage search engines from indexing this site’ checkbox is not checked.
This setting is sometimes left on from staging or development and will block Google from indexing your new domain entirely.
Confirm Your robots.txt Isn’t Blocking the New Site
The ‘Discourage search engines’ checkbox isn’t the only thing that can block crawling. Your robots.txt file can do it too, and a stale rule carried over from staging is easy to miss.
To check this, open https://yournewdomain.com/robots.txt in your browser.
Confirm two things. First, that no stray Disallow: / rule (or a leftover staging rule) is blocking important content. Second, that any Sitemap: line points to your new domain’s sitemap, not the old one.
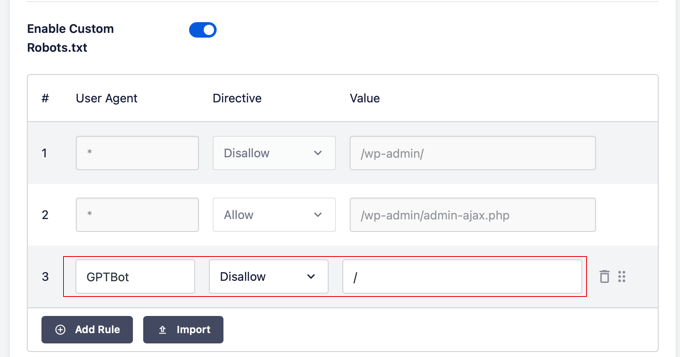
If you use All in One SEO, you can fix this without editing files by hand. Just go to All in One SEO » Tools, turn on the ‘Enable Custom Robots.txt’ toggle, and correct any outdated rule. The robots.txt editor is included in the free version.
For more information on getting these rules right, see our guide on how to optimize your robots.txt for SEO in WordPress.
Step 3: Set Up 301 Redirects From Your Old Domain
A 301 redirect tells Google that your old URLs have permanently moved to new ones.
Think of a 301 redirect like filing a permanent ‘Change of Address’ form with the post office so your SEO reputation forwards correctly.
Without 301 redirects, Google treats your old and new domains as entirely separate sites, and your ranking signals stay on the old domain.
For a complete overview of your options, see our guide on how to do a full site redirect in WordPress.
Set Up a Full Site Redirect in AIOSEO
All in One SEO is the best SEO toolkit for WordPress that lets you handle sitemaps, canonical tags, keyword tracking, and redirects all in one place.
Its Full Site Redirect tool (Pro plan and above) is the simplest way to redirect your entire old domain to the new one. You configure it once and AIOSEO automatically sends all your old URLs to their matching pages on the new domain using 301 redirects.
On your old WordPress site, go to All in One SEO » Redirects. If you are enabling this for the first time, click the ‘Activate Redirects’ button. Then click the ‘Full Site Redirect’ tab.
You’ll see a ‘Relocate Site’ toggle. Go ahead and turn it on.

In the ‘Relocate to domain’ field, enter your new domain URL. Make sure to
double-check the spelling. A typo here means every visitor on your old
domain gets sent to the wrong place.
Finally, click ‘Save Changes’. AIOSEO will now redirect all traffic from your old domain to the matching pages on your new domain automatically.
Important Warning: Because this method runs from a plugin, All in One SEO must stay installed and active on your old site, and that old WordPress installation must remain live. You must keep your old domain name registered, your old web hosting active, and your old WordPress site installed. If you delete the old site, cancel the hosting, or let the domain expire, your redirects will instantly stop working.
Test Your Redirects Before Proceeding
Testing your redirects before notifying Google is important. Submitting a change-of-address notification with broken redirects slows the entire migration recovery.
Instead, spend 10 minutes checking your key URLs now to avoid weeks of ranking problems later.
I recommend visiting an external tool like httpstatus.io rather than testing in your browser, as web browsers often ‘remember’ old redirects and can show you false results.
Enter your old homepage URL and confirm it returns a 301 status and resolves to the correct new-domain URL.
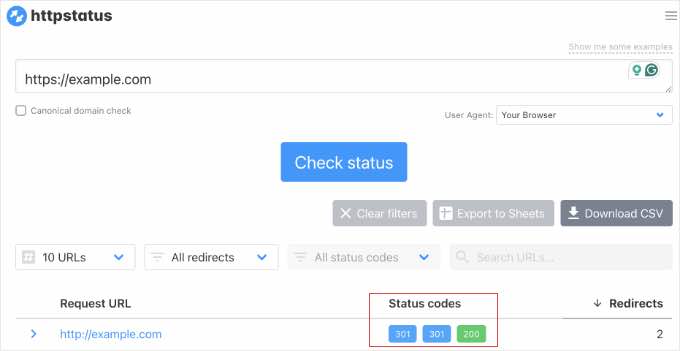
You should repeat this test for your top 5 posts and your main category
pages to ensure the URLs are mapping properly to the new site.
If httpstatus.io shows a 302 instead of 301, or a chain of multiple hops, then go back to All in One SEO » Redirects.
First, open the ‘Full Site Redirect’ tab and confirm there are no typos in the ‘Relocate to domain’ field. If that looks correct, check your standard ‘Redirects’ tab to ensure you don’t have older, individual redirect rules conflicting with your new full site redirect.
Pro Tip: A redirect chain happens when oldsite.com/page goes to a staging URL, which then goes to newsite.com/page. Each extra hop in the chain passes slightly less SEO equity and adds latency for visitors. Fix chains so every old URL redirects directly to the new URL in a single 301 hop.
Step 4: Register Your New Domain in Google Search Console
Google treats your old and new domains as entirely separate properties. To
transfer your ranking signals, you need to verify the new domain in Google
Search Console, submit a change-of-address notification, and resubmit your
sitemap.
For the complete steps, see Step 5 of our guide on how to properly move WordPress to a new domain without losing SEO.
Here is a summary of the three things you need to do.
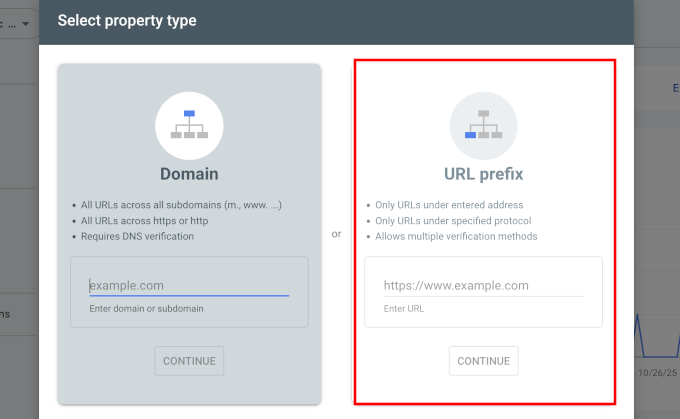
Add and Verify Your New Domain Property
You need both your old and new domains as verified properties in
Google Search Console. Your old domain should already be there.
For the new one, click the property dropdown at the top left, select ‘Add
Property’, choose your property type, and follow the verification steps.
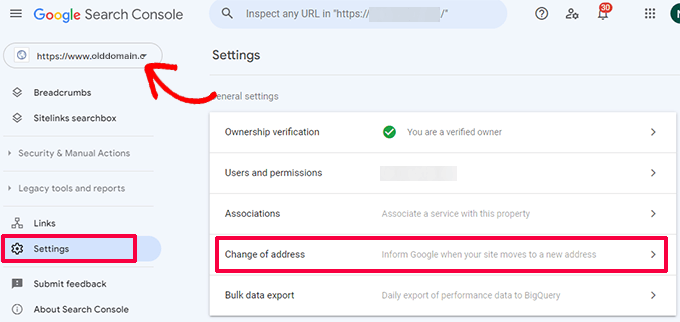
Submit the Change-of-Address Notification
This is the step that tells Google your site has permanently moved.
You need to switch to your old domain property in Google Search Console and
go to Settings » Change of address.
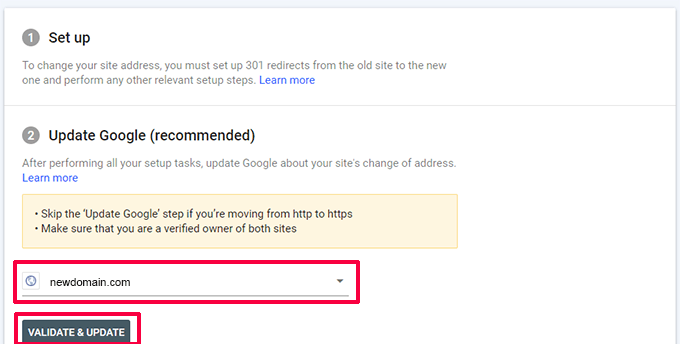
Next, you should select your new domain from the ‘Update Google’ section, and click ‘Validate & Update’.
Google will verify your 301 redirects are in place and walk you through a
brief wizard to complete the request. If Google Search Console cannot verify
the redirects, then go back to Step 3 and confirm your Full Site Redirect is
active before retrying.
Resubmit Your XML Sitemap
All in One SEO automatically updates your sitemap’s internal links when your
site URL changes, but you still need to resubmit this new map to Google
Search Console manually. This queues your new domain’s URLs for crawling
rather than waiting for the next automated crawl cycle.
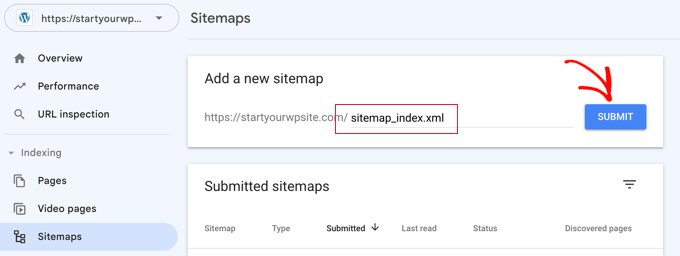
First, you will want to double-check that your active sitemap is reflecting the new domain. In your new WordPress dashboard, navigate to AIOSEO » Sitemaps to view your configuration.
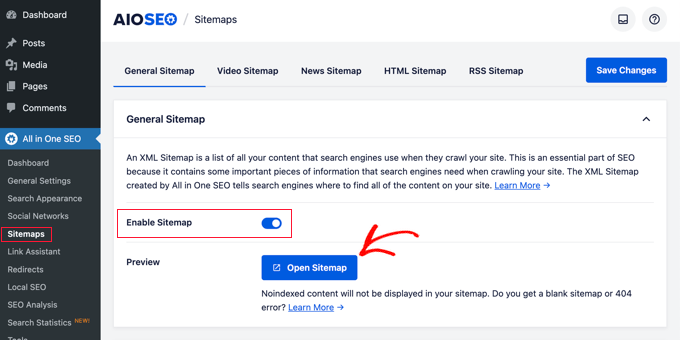
Simply click on the ‘Open Sitemap’ button to see a link to your XML sitemap.
Once you copy your updated sitemap URL from this screen, you can head back
over to your new Google Search Console property and click ‘Sitemaps’ in the
left sidebar to paste and submit it.
For a visual walkthrough on accessing this menu in your plugin and submitting the link to Google, see our step-by-step tutorial on how to add an XML sitemap to Google Search Console.
Step 5: Verify Canonical URLs Are Correct
A canonical URL is the ‘official’ version of a page that search engines
should index and rank. After a domain migration, canonical tags that still
point to your old domain are one of the most common causes of slow ranking
recovery.
The new-domain page effectively tells Google to rank the old URL instead.
Note: If you used Duplicator to migrate your site in Step
2, it automatically updates canonical URLs stored in the database during
deployment. You may find that everything already looks correct. Still run
the spot-check below to catch any canonical overrides set at the individual
post level, which Duplicator may not update.
Check Your Global Canonical Settings in AIOSEO
All in One SEO
automatically generates sitewide canonical tags based on your WordPress site
URL. After migrating with Duplicator, these should already reflect your new
domain.
What you do need to verify manually are two redirect settings that prevent
duplicate-content issues on thin pages.
Go to All in One SEO » Search Appearance and click the ‘Advanced’ tab. You will see a ‘Paged Format’ setting, which adds a page number variable to the SEO title and description of paginated archive pages (for example, ‘Page 2’, ‘Page 3’).
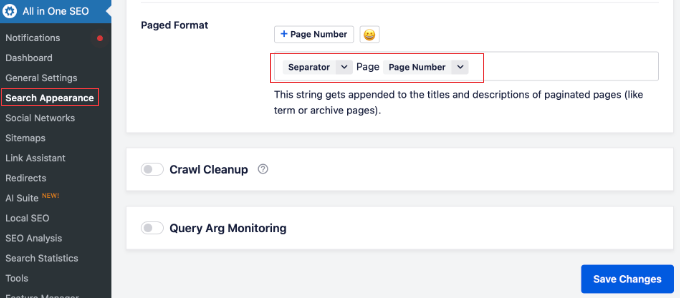
The default format shows three components: a separator, the word ‘Page’, and
a page number variable. You just need to confirm the field isn’t blank.
If it is blank, you can restore the default by selecting a separator from the first dropdown, typing ‘Page’ in the text field, and selecting the page number variable from the final dropdown.
This makes each paginated page appear unique to Google without using redirects, preventing duplicate content flags.
Then click the ‘Image SEO’ tab in the same Search Appearance menu.
Confirm that ‘Redirect Attachment URLs’ is not set to ‘Disabled’. This redirects thin media attachment pages to the parent post or page where the image is hosted to keep those low-value pages out of Google’s index.
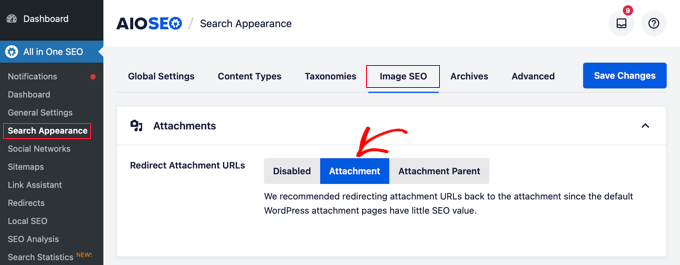
The ‘Attachment’ option (the default) redirects attachment pages directly to
the image file. ‘Attachment Parent’ redirects to the post or page where the
image is used, though images not attached to any post will still show their
attachment page.
Either option keeps these thin pages out of Google’s index.
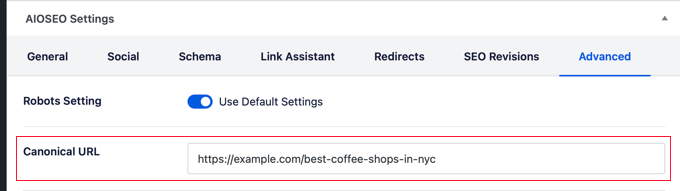
Spot-Check Your Most Important Pages
Global settings cover the default, but individual posts and pages can have canonical overrides set at the post level.
You should check your highest-traffic pages to catch any lingering old-domain references.
You can open each page in your browser, right-click anywhere on the page,
and select ‘View Page Source’. Then, simply use Ctrl+F (Cmd+F on Mac) to
search the source code for <link rel="canonical".
Confirm the URL in the canonical tag references your new domain.
If you find any page still showing the old domain, then open that post in your new site’s WordPress editor, scroll down to the All in One SEO settings panel, click the ‘Advanced’ tab, and update the canonical URL field.
Finally, save the post to apply the change.
For a deeper explanation of how canonical tags work, see our guide on
what a canonical URL is and how to use it in WordPress.
Step 6: Fix Database URLs, Mixed Content, and Broken Links
After migration, some images, scripts, and stylesheets on your new site may still be pointing to your old domain or loading over an insecure HTTP connection. Those stale assets will cause broken images and security warnings the moment your old domain goes offline.
While migration tools like Duplicator replace most of these automatically during deployment, it’s important to run a manual cleanup sequence to catch hardcoded errors, mixed content, or broken internal links.
Replace Hardcoded URLs in the Database
Warning: Replacing database URLs is a permanent, irreversible action. Before you start, always create a complete backup of your website.
While Duplicator handles standard URL updates during migration, hardcoded links inside page builder layouts, text widgets, or custom theme options sometimes get left behind. Running a quick scan with Search & Replace Everything by WPCode makes sure no old links are missed.
I recommend this plugin because it replaces URLs across your entire WordPress database without corrupting serialized data, which is a common problem with less careful tools.
We have a detailed article on how to easily update URLs when moving your WordPress site, but here are the main steps.
First, you need to install and activate Search & Replace Everything from the WordPress plugin repository. If you need help, see our guide on how to install a WordPress plugin.
Once activated, simply navigate to
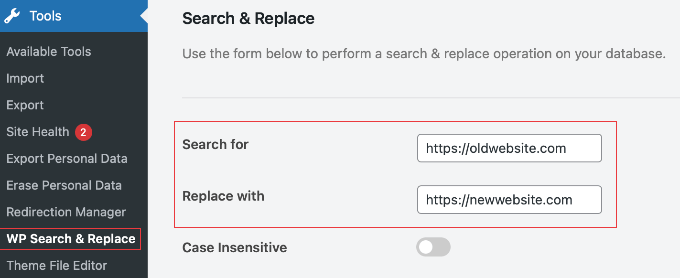
Tools » WP Search & Replace in your WordPress admin.
Here, you’ll need to enter your old domain URL in the ‘Search for’ field and
your new domain URL in the ‘Replace with’ field.
Then make sure you check all available database tables in the list below the input fields.
You can do this easily by clicking the ‘Select All’ link.
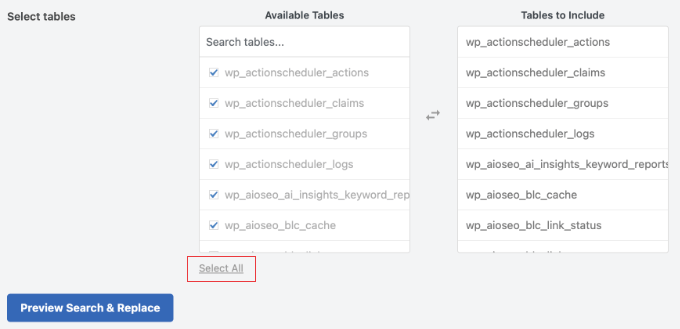
Next, click the ‘Preview Search & Replace’ button to see a preview of the URLs that can be replaced, without making any changes.
Review the row count to confirm the number looks reasonable for your site
size.
Once you are satisfied with the dry run preview, you are ready for the live replacement. Simply click the ‘Replace All’ button.
Note for Page Builder Users: If you use a page builder like Elementor or Divi, then you might still see broken background images after running a Search & Replace. This is because builders store URLs in static CSS files.
To fix this, you must clear your WordPress cache and regenerate your page builder files. For example, in Elementor, go to Elementor » Tools and click ‘Regenerate Files & Data’.
Check for and Fix SSL Mixed Content Errors
Before chasing any mixed-content warnings, confirm a valid SSL certificate is installed and covers your new domain. Most hosts issue one automatically, but a brand-new domain sometimes needs it applied first.
If your old domain used standard HTTP and your new one forces secure HTTPS, then you might notice a broken padlock icon or a security warning in your browser address bar when visiting your new site. This is a mixed content error.
It happens when your website configuration is secure, but an embedded background script, stylesheet, or image asset is still trying to load over an insecure connection.
If you see active security warnings or broken images on your new domain, you can resolve them quickly by following our step-by-step guide on how to fix the mixed content error in WordPress.
Scan for Remaining Broken Links
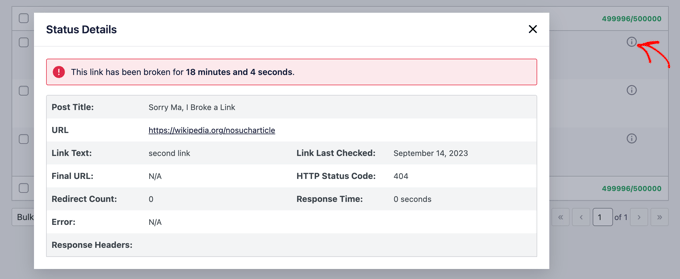
After replacing your database URLs, it’s a good idea to use the Broken Link Checker by AIOSEO plugin to catch any internal links still resolving to unexpected 404 errors.
For a complete visual walkthrough on managing these inline errors, see our tutorial on how to find and fix broken links in WordPress.
Once activated and connected, the plugin automatically scans your content in the background. You can check its progress at any time by navigating to Broken Links » Broken Links in your WordPress admin area.
If the background scan uncovers any issues, you will see them compiled in a clean list. For each broken link found, you can use the inline ‘Edit URL’ option to correct the mistake instantly, or click ‘Unlink’ to safely remove the dead link from your post.
Once you finish cleaning up the list, the cloud scanner will verify the fixes during its next automated pass.
Clean internal links also prevent redirect chains that waste Google’s crawl budget. If the scanner flags more broken links, fix them the same way and check back after the next background pass.
Find and Fix Any Hard 404 Errors
The broken-link scan above catches dead links inside your content. A hard 404 is a different problem: a page on your new site that loads as ‘Not found’ because it never migrated, its URL was renamed, or its redirect didn’t fire.
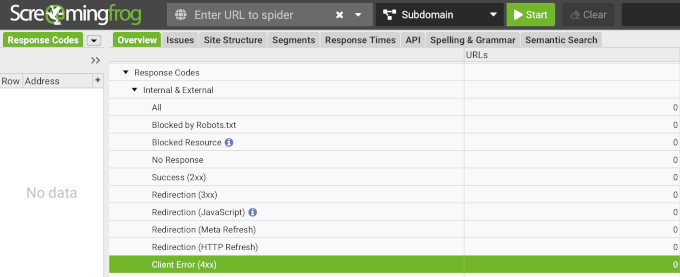
To find these, run the same Screaming Frog crawl you used in Step 1, but this time point it at your new domain. Once the crawl finishes, click the ‘Response Codes’ tab and look for ‘4xx Client Error’ to see every URL returning a 404.
It also helps to cross-check this list against Google Search Console.
In your new domain property, go to Indexing » Pages and look for any ‘Not found (404)’ rows, which flag pages Google expected to find but couldn’t.

For each hard 404, you have two fixes:
- If the page should still exist, restore or republish it at its correct address.
- If the page moved to a new URL, you can add a 301 redirect in All in One SEO that sends the old address straight to the new one. This recovers the ranking signals that a dead page would otherwise lose.
Update Your Most Valuable External Backlinks
The steps above fix the links inside your own site. But other websites may still be linking to your old domain, and those external backlinks are some of your strongest ranking signals.
Your 301 redirects do pass that ranking value to your new domain. But that hand-off isn’t permanent: it can weaken over time as it passes through the redirect, and it stops completely if you ever let the old domain expire.
A direct link to your new domain is always stronger than one that has to pass through a redirect. So it’s worth updating your most valuable backlinks at the source.
To find them, open Google Search Console and go to Links » Top linking sites on either your old or new property. This shows you which sites send you the most links, so you know where to focus.
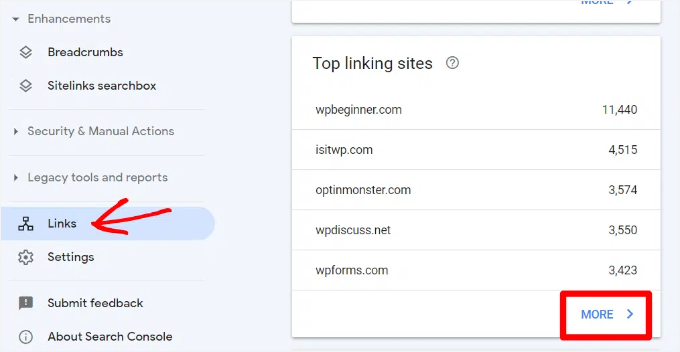
I recommend prioritizing the high-authority mentions you can actually influence. These are usually your guest-post author bios, press mentions, resource-page listings, and partner sites.
For each one, send the site owner a short, polite email asking them to update the link to your new domain. You can’t edit links on sites you don’t control, so a friendly request is the only route for those.
You won’t get every link changed, and that’s fine. Updating even the top handful of your highest-authority backlinks protects the ranking power that matters most.
Step 7: Monitor Ranking Recovery With AIOSEO and MonsterInsights
Ranking recovery after a domain migration takes time.
Your main concern in the weeks following a site relocation is to tell the difference between normal, short-term changes due to search engine algorithms and genuine technical problems that require you to do something.
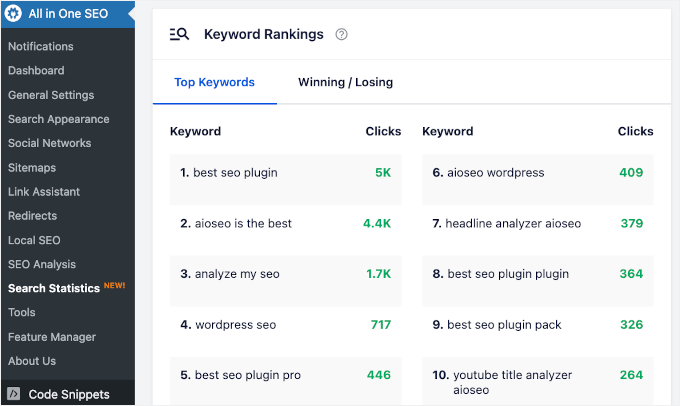
Track Keyword Positions in AIOSEO Search Statistics
All in One SEO’s Search Statistics dashboard pulls your Google Search Console data directly into your WordPress admin area. This allows you to monitor your key word positions without needing to log into GSC separately.
To see your recovery, navigate to AIOSEO » Search Statistics and open your keyword performance reports. From here, you can cross-reference your live numbers against the pre-migration baseline CSV you saved during Step 1.
If you want to learn how to deeply customize these reports, see our guide on how to see search analytics in WordPress.
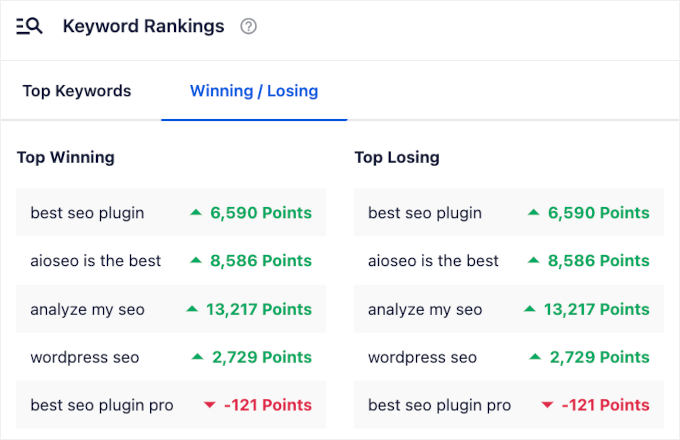
Be sure to click into the ‘Winning / Losing’ tab to quickly identify specific pages that have lost the most visibility since the move.
You can also add your top 20 migration-critical keywords to the built-in Rank Tracker to make sure you get immediate updates on your most valuable revenue terms.
Compare Traffic Trends in MonsterInsights
While keyword monitoring shows you your search engine positions, tracking actual traffic volume confirms how users are responding to the new domain.
MonsterInsights brings your Google Analytics data directly into WordPress, making it simple to run week-over-week traffic checks. To set it up, see our guide on how to install Google Analytics in WordPress.
Important: Keep your existing Google Analytics property. Do not create a new one for the new domain. Your whole recovery check depends on comparing the new numbers against your pre-migration baseline, and a fresh property starts that history at zero. Stay on the same property and just update its data stream to the new site URL, so your week-over-week comparison stays intact.
You can analyze traffic by navigating to Insights » Reports in your WordPress dashboard to open the default Overview Report.
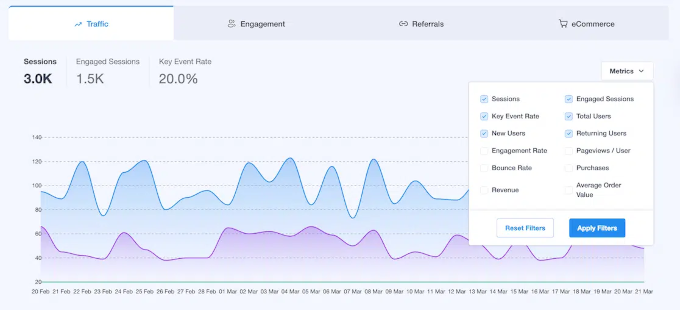
Then, you can use the date range picker to compare your post-migration stats against your old baseline window. Then, look at the traffic breakdown to make sure your organic search is recovering proportionally.
For a complete look at measuring traffic spikes or troubleshooting flatlines, check out our guide on how to check if your WordPress SEO is actually working.
To make your data easy to scan over the next 180 days, you can also use the Site Notes feature (available on the Pro plan and above) to pin your migration date directly to the analytics timeline graph.
You’ll need to go to Insights » Site Notes, click ‘Add Note’, and log the exact move date. This creates a permanent visual anchor on your overview line charts so you can see precisely when your traffic started recovering.

Your Week-by-Week Recovery Timeline
It is totally normal to feel a little stressed when you see your rankings change a lot after a domain migration. Knowing what a normal recovery looks like can help you avoid making panic changes to your content, which can actually slow things down.
Here is a week-by-week look at what to expect.
Week 1: Discovery and Fluctuation
The first week is the most unsettling. Google’s ‘crawlers’ (the automated
bots that read and index websites) are discovering your redirects and
beginning to process the domain change.
Rankings will fluctuate (shift up and down) significantly during this
period.
Some keywords may temporarily disappear from results entirely, even for pages with perfect redirects in place. Organic traffic typically drops 30–70% from your baseline during week 1, though well-prepared migrations often see smaller dips.
This is expected and is not a sign that your migration failed.
If you moved to a new hosting provider as part of this migration, DNS propagation can take 24–48 hours. During this time, some visitors and crawlers may still reach your old site. GSC data from the first 48 hours after migration may look unusual as a result. This is normal.
It’s tempting to start fixing things when your traffic dips, but try to resist. For this first week, just focus on making sure your technical setup is working properly. Try to avoid rewriting content, changing URLs, or tweaking your AIOSEO settings.
If you change too many things at once, it will only confuse Google and make it harder to spot real problems.
Week 2: Signals Begin Transferring
By week two, Google has typically processed most of your 301 redirects and is beginning to pass ranking signals to the new domain.
With solid redirects in place, many sites see some traffic recovery begin by week 2. But the pace varies significantly by domain authority, niche, and crawl budget.
Make sure you log in to Google Search Console and check your new domain property for any ‘Redirect Error’ or ‘Soft 404’ notifications. A soft 404 occurs when a page loads successfully but returns little or no useful content. Google treats these as potential content quality issues.
These appear in the Pages report under Indexing » Pages. Fix any errors flagged here before they turn into larger ranking losses.
Week 4 and Beyond: Recovery Assessment
By week four, you should have a clear picture of your overall recovery. Sites with clean 301 redirects often see 80–100% recovery within 4–8 weeks.
But timelines vary, and some sites take longer even when your migration was done perfectly.
Now is a great time to open up your AIOSEO Search Statistics dashboard and pull out that baseline CSV you saved back in Step 1. Let’s see how your keywords are doing.
If you spot any pages that are still ranking much lower (like 50% or more below where they started), don’t worry. They just need a little one-on-one attention.
For those specific pages, simply double-check these three quick things:
- The redirect: Is the 301 redirect working perfectly and pointing to the right place?
- The canonical tag: Does the canonical URL on that specific page definitely point to your new domain?
- Google’s index: Does Google Search Console’s Pages report show that the new URL is successfully indexed?
Once you fix any issues you find, simply give Google another two weeks to process the updates before you check your stats again. Remember, SEO takes a little patience, but by catching these errors now, you are setting your new domain up for long-term success.
Frequently Asked Questions About Domain Migrations & SEO
Here are the most common questions about verifying SEO after a WordPress domain migration.
How long does it take to recover SEO after a domain migration?
WordPress sites with clean 301 redirects in place often see 80–100% ranking recovery within 4–8 weeks, though timelines vary depending on domain authority, niche, and redirect completeness.
Sites with missing redirects, redirect chains, or stale canonical URLs pointing to the old domain can take 3–6 months.
The single biggest factor in recovery speed is redirect quality. Every old
URL needs a direct 301 to its new-domain equivalent with no intermediate
hops.
Will I lose all my rankings when I change domains?
No, but you will experience a temporary drop while Google processes the
change. A 301 redirect transfers your ranking signals from the old URL to
the new URL. Google follows the redirect and eventually ranks the new-domain
page instead of the old one.
Sites that migrate without 301 redirects do permanently lose their SEO
equity. Google treats the new domain as a brand-new site with no history.
Do I need to keep paying for my old hosting and domain?
You need to keep the old domain registered, but not necessarily the old hosting. The plugin-based redirect in this guide runs from your old WordPress site, so it needs that site and its hosting to stay active.
If you’d rather stop paying for hosting, you can set the redirect up at the domain level instead (for example, with a free Cloudflare redirect rule) and then cancel the old hosting. Either way, keep the old domain registered for at least a year so your redirects keep passing your ranking signals.
Do I need to update all my internal links after a domain migration?
Yes. Even though your 301 redirects will automatically forward visitors to the right place, you should still update your links.
Leaving old links in your content forces users to wait for the redirect to load, which slows down your website. It also makes search engines work much harder to read your pages.
Instead of changing them one by one, you can use the
Search & Replace Everything by WPCode
plugin to safely
update every old link
in just a few minutes. This keeps your site fast and SEO-friendly.
What else should I update after moving to a new domain?
Update everywhere your old domain is referenced off your site, not just your redirects and internal links.
That includes any local directories and business listings, your social media profiles (YouTube, LinkedIn, Facebook, and X), and your Google Business Profile.
You’ll also want to swap the old domain out of your email signatures and any UTM or campaign links you use in ads and newsletters.
Think of it as housekeeping. It keeps visitors from landing on your old domain and keeps your branding consistent across every place people find you.
What should I do if rankings have not recovered after 8 weeks?
You’ll want to start with a redirect audit. Simply crawl your old domain
with Screaming Frog and confirm every URL returns a 301 to the correct
new-domain URL.
Then, you can
check if WordPress is still redirecting
to the old domain, a common post-migration issue caused by stale URLs in the
database.
Also verify your new domain is not accidentally set to ‘noindex’ anywhere.
Check both AIOSEO’s global settings and your WordPress ‘Reading’ settings.
Run a full
WordPress SEO audit
to catch any remaining technical issues. Also check your schema markup: if
your old domain URL is hardcoded in any JSON-LD schema blocks, that
conflicting signal can create inconsistency that may affect how Google
interprets your site’s authority.
Can I do a domain migration without losing any traffic at all?
A zero-traffic-loss migration is theoretically possible but extremely rare
in practice. Even with perfect 301 redirects, Google takes time to process
the change, and some short-term fluctuation is nearly universal.
What you can realistically achieve is a minimal-impact migration where
traffic dips for 1–2 weeks and then fully recovers within a month.
Additional Resources for Domain Migration SEO
Migrating to a new domain is a big project, and you’ve done the work to protect your SEO.
You have successfully set up your redirects, cleaned up your old links, and put a solid tracking system in place using AIOSEO and MonsterInsights.
Now that the hard part is done, you can take a deep breath. Just give Google a little time to process the changes, and you should see your search traffic stabilize over the next 4 to 8 weeks.
You may also want to check out these related guides:
-
How to Easily Move WordPress to a New Domain Without Losing SEO. A complete step-by-step guide to migrating your WordPress site using
Duplicator, including pre-migration backups and post-migration checks. -
Beginner’s Guide to Creating 301 Redirects in WordPress. Learn how to set up individual 301 redirects using All in One SEO’s
Redirection Manager without editing any server files. -
How to Perform an SEO Audit and Generate Free SEO Report. A checklist-style walkthrough of the most important technical,
on-page, and off-page SEO factors to review on any WordPress site. -
How to Find and Fix Broken Links in WordPress (Step by Step). How to use AIOSEO’s Link Assistant and other tools to automatically
detect and repair broken links across your site. -
How to Easily Update URLs When Moving Your WordPress Site. A quick guide to using Search & Replace Everything by WPCode to
update hardcoded URLs in your WordPress database after any migration.
If you liked this article, then please subscribe to our YouTube Channel for WordPress video tutorials. You can also find us on Twitter and Facebook.
The post How to Verify Your SEO Is Intact After a WordPress Domain Migration first appeared on WPBeginner.

